You sit down to work, glance under your desk, and there it is—a tangled nest of power cords, USB cables, ethernet wires, and charging cables that looks like it’s plotting something. Cord chaos isn’t just ugly; it’s a productivity killer. Every time you snag your foot on a cable or waste five minutes untangling a charger, you’re pulled out of focus. Good home office cable management fixes all of that. If you’re building a complete workspace, our Home Office Desk Setup Ideas guide covers desk layouts that work with these cable solutions. In this guide, I’ve rounded up 7 of the best cable management solutions—from simple velcro ties to full under-desk trays—so you can reclaim your workspace and keep every wire exactly where it belongs.
Focus Mode HQ is reader-supported. When you buy through links on our site, we may earn an affiliate commission.
All 7 Cable Management Solutions at a Glance — Full Comparison
Before you buy, it helps to see how every option stacks up side by side. The table below compares all 7 cable management solutions for home office setups across the factors that matter most: price, installation effort, durability, and what each one is genuinely best for.
| Product | Price Range | Best For | Installation | Durability |
|---|---|---|---|---|
| TooCust 2-Pack Under-Desk Cable Tray | $25 – $60 | Heavy power strips, surge protectors | Moderate — screwdriver or clamp mount | ★★★★★ Steel, 10–15 lbs |
| VELCRO ONE-WRAP Cable Ties | $5 – $10 | Bundling cables, frequent re-routing | None — wrap and go | ★★★★☆ Reusable 100+ times |
| OHill 16-Pack Cord Organizer | $7 – $12 | Routing single cables along desk edges | Easy — peel-and-stick, no tools | ★★★☆☆ Adhesive weakens over time |
| D-Line Cable Management Box | $20 – $35 | Hiding power strips and excess cord | Easy — place box, feed cables | ★★★★☆ ABS plastic, ventilated |
| JOTO Cable Sleeve Kit | $15 – $25 | Complete solution in one box | Easy — everything included | ★★★★☆ 40+ pieces, comprehensive |
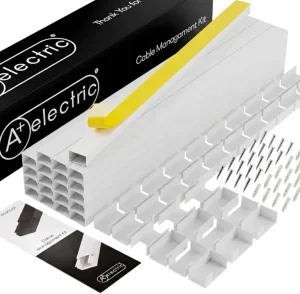
| A+ Electric Cord Cover Kit | $15 – $30 | Wall-mounted cable routing | Moderate — adhesive or screw mount | ★★★★☆ PVC, paintable |
| Cable Labeling System | $6 – $12 | Identifying cables behind desk | None — wrap and label | ★★★☆☆ Print may fade over years |
The 7 Best Home Office Cable Management Solutions
1. Best Under-Desk Cable Management Tray
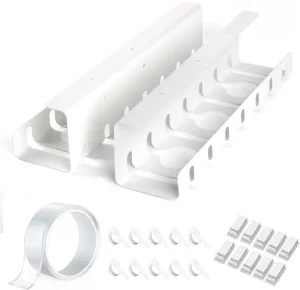
A metal under-desk cable tray mounts directly beneath your desktop and gives every wire a home. Instead of cables dangling behind your desk, they rest inside a sturdy basket where they are completely out of sight but easy to access. This two-pack gives you enough length to span most standard desks, and the open design means you can drop cables in from any angle without threading them through holes.
Best for: People who want hidden storage without drilling.
- Mounts under desk for completely hidden storage
- Open design — drop cables in from any angle
- Two-pack covers most standard desk widths
- Requires screws or adhesive mounting
- Metal edges can be sharp — watch your fingers
2. Best Reusable Velcro Cable Ties

Sometimes the simplest solution is the best one. A roll of reusable velcro cable ties costs less than a lunch and solves more problems than you’d expect. Unlike zip ties, these are endlessly adjustable—you can add a cable, remove one, or re-route everything without cutting anything. I keep a handful in my desk drawer at all times. They’re ideal for bundling monitor cables, managing desk-lamp cords, and keeping the mess behind your PC tower under control.
Best for: Anyone who rearranges cables regularly.
- Dirt cheap—typically under $7 for a 50-pack
- Reusable and adjustable, unlike zip ties
- Gentle on cables—no pinching or crushing
- Works for literally any cable type
- Not a standalone solution for large cable nests
- Velcro can collect dust over time
3. Best Adhesive Cable Clips and Desk Holders
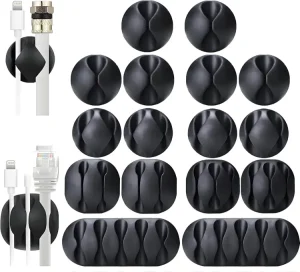
If you’ve ever reached for your charging cable only to find it’s slipped behind the desk—again—you need adhesive cable clips. These small, stick-on holders route cables along your desk edge precisely where you want them. The rounded channel design grips cables firmly without pinching, and the 3M adhesive backing stays put on wood, metal, glass, and laminate surfaces. I use these to keep my phone charger, headphone cable, and USB hub cable right at the desk edge where I can grab them instantly.
Best for: Keeping charging cables and headphones within reach.
- Prevents cables from slipping off the desk
- Strong 3M adhesive holds on most surfaces
- Multiple sizes accommodate thin and thick cables
- Clean, minimal appearance
- Adhesive may leave residue on some finishes
- Not ideal for heavy power cords
4. Best Cable Management Box

The power strip under your desk is ground zero for cable chaos. A cable management box encloses your entire power strip and all the excess cord slack in a clean, ventilated container that sits discreetly on or under your desk. This particular model is large enough to fit even oversized surge protectors with bulky wall-wart adapters, and the dual side openings let cables exit neatly in two directions. It’s the single fastest way to make the ugliest part of your setup disappear entirely.
Best for: Hiding power strips and excess cable slack.
- Instantly hides the messiest part of any desk setup
- Fits large surge protectors and bulky adapters
- Ventilated to prevent overheating
- Available in black or white to match decor
- Takes up floor or desk surface space
- Cords still need management where they exit the box
5. Best Cable Sleeve Kit for Bundling
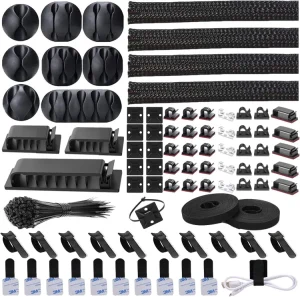
If you’re starting from zero and don’t want to piece together a solution, an all-in-one kit is the way to go. This bundle includes cable sleeves, adhesive clips, velcro ties, and cable raceway sections—everything you need to tackle a full desk setup in one box. The neoprene cable sleeves are the standout: they zip around multiple cables to create a single clean bundle that looks far better than loose wires running to your monitor and peripherals.
Best for: Starting from scratch with a complete system.
- Everything you need in one purchase
- Neoprene sleeves create clean, professional bundles
- Includes multiple solution types for different needs
- Good value vs. buying components separately
- Some pieces may go unused depending on setup
- Quality varies across kit components
6. Best Cable Raceways for Walls or Desk Edges
When cables need to travel—along a wall, across a baseboard, or down a desk leg—cable raceways are the answer. These PVC channels have a snap-on cover that hides the cables inside while keeping them accessible if you need to add or remove wires later. They’re paintable too, so you can match them to your wall color and make them practically invisible. I recommend these specifically for setups where your desk isn’t against a wall and cables have to bridge open space.
Best for: Running cables along walls or baseboards cleanly.
- Snap-open cover for easy cable access
- Paintable to match any wall color
- Self-adhesive backing—no drilling required
- Available in multiple widths for different cable volumes
- Cutting to length requires a saw or heavy-duty scissors
- Adhesive may weaken on textured walls over time
7. Best Cable Labeling System

When you’ve got six identical black cables snaking behind your desk, troubleshooting becomes a nightmare. Is that the monitor cable or the speaker power? A simple cable labeling system solves this with color-coded or writable tags that wrap around each cable near the plug. Next time you need to unplug your docking station, you’ll know exactly which cable is which without tracing it through the entire cable management setup you so carefully built.
Best for: People managing complex setups with many identical cables.
- Makes troubleshooting and reconfiguring painless
- Color-coded system for quick visual identification
- Pre-labeled options plus blank writable tags included
- Works with cables of any thickness
- Adds a small step to initial setup
- Labels can fade or peel after years of handling
How to Choose the Right Home Office Cable Management Setup
With seven products to pick from, the question isn’t “which one?”—it’s “which combination solves my specific mess?” Here’s how to think about it.
Start with a power audit. Unplug everything. Yes, everything. Then plug back only what you actually use. You’ll be surprised how many cables belong to devices you haven’t touched in months. This step alone often cuts the problem in half.
Identify your bottleneck. Every messy desk has one main culprit. Is it the power strip on the floor surrounded by adapter bricks? Get a cable management box. Is it cables slipping off the desk edge? Grab adhesive clips. Is it the sheer volume of wires between your laptop and monitors? A docking station is your answer. Fix the biggest problem first.
Layer your solutions. Professional-looking cable management is almost always a stack of multiple products working together: velcro ties bundle the cables, a tray hides the power strip, raceways guide bundles along desk legs, and clips keep the cables you need daily within reach. Don’t expect one product to do everything.
Consider your desk type. A fixed desk against a wall has different needs than a standing desk or a desk floating in the middle of a room. Standing desks need slack management for the rise and fall; floating desks need routes to bridge the gap to the nearest outlet. We’ll cover both scenarios below.
If you’re also thinking about monitor positioning—which directly affects cable routing—check out our guide to the best monitor arms for home offices. Monitor arms with built-in cable channels can cut your visible cable count by half.
Cable Management for Standing Desks
Standing desks add a unique challenge: your cables need to look clean at both sitting and standing height without pulling or snagging during transitions. For a full rundown of the best options, check out our Best Standing Desks for Remote Work guide. The solution is to plan for movement from the start.
Anchor the power strip to the desk underside. Use an under-desk cable tray to mount your surge protector directly to the desk surface. This way the power strip rises and falls with the desk, and you only have one cable—the surge protector’s power cord—running to the wall outlet.
Leave a service loop. That single cord running from the desk to the wall needs enough slack to reach standing height without tension, but not so much that it pools on the floor when you’re sitting. Coil the excess and secure it with a velcro tie so it expands and contracts cleanly.
Route everything along the desk frame. Standing desk frames have metal crossbars and legs that are perfect for running cables. Use velcro ties or adhesive clips to route monitor cables, docking station wires, and peripheral cords along the frame instead of letting them dangle.
Use a cable spine. For the section where cables transition from desk to floor, a flexible cable spine or braided sleeve keeps everything in one neat column that bends smoothly during height adjustments. This is far cleaner than loose cables hanging down.
Cable Management for Dual Monitor Setups
Dual monitors mean double the video cables, double the power cords, and double the opportunity for chaos. Using the right monitor arms for home office setups with built-in cable routing can dramatically simplify this. Here’s how to handle it.
Invest in monitor arms with cable channels. This is the single biggest win for dual-monitor cable management. Quality monitor arms route display and power cables through the arm itself, hiding them from view entirely. What could be six visible cables becomes nearly invisible. If you haven’t upgraded yet, our monitor arms guide covers the best options.
Bundle monitor cables together. For each monitor, wrap the video cable and power cable together with a velcro tie every 12-18 inches. This turns two dangling cables into one manageable bundle. Do the same for both monitors, then combine the bundles where they converge behind your PC or docking station.
Center your cable hub. Position your docking station, USB hub, or PC tower centrally between the two monitors. This minimizes the cable distance to each monitor and keeps everything symmetrical—which matters more than you’d think for both appearance and cable length management.
Label everything. With two identical monitor setups, every cable has a twin. Label both ends of each video cable and power cord so you never have to trace a cable through your carefully managed setup when something needs to change.
Step-by-Step Home Office Cable Management Makeover
Ready to tackle your cable chaos If you work from multiple locations, our Portable Home Office Setup guide has tips for keeping cables organized on the go.? Here’s the exact process I use—and recommend—for a full desk cable makeover. Budget about two hours for a complete job.
Step 1: Unplug everything. Take a “before” photo—you’ll appreciate it later. Then disconnect every cable from every device. Lay them out on the floor so you can see what you’re working with.
Step 2: Purge what you don’t need. That old printer cable? The charger for a device you replaced two years ago? The USB hub you never use? Get rid of them. If a cable doesn’t have a job, it doesn’t belong in your workspace.
Step 3: Mount the power strip. Attach your surge protector to the underside of your desk using an under-desk tray or mounting bracket. This is the foundation everything else builds on. If you’re on a budget, heavy-duty velcro or 3M command strips can work in a pinch—check our budget home office guide for more money-saving tips.
Step 4: Route the big cables first. Start with the thickest, least flexible cables—power cords, ethernet, display cables. Route these along desk edges, legs, and frames. These are the backbone; everything else wraps around them.
Step 5: Bundle as you go. As you route each group of cables, wrap them with velcro ties every 12-18 inches. Don’t cinch them too tight—you want cables to slide if needed, not get crushed.
Step 6: Add clips and raceways. Now install adhesive clips along the desk edge for frequently accessed cables (phone charger, headphone cable). Add raceways for any cable runs along walls or baseboards.
Step 7: Hide the evidence. Tuck your cable management box over the power strip bundle, slide excess slack into the under-desk tray, and make sure no cables are visible from your normal sitting position.
Step 8: Test and label. Power everything on. Does it all work? Good. Now label each cable near the plug so future-you doesn’t have to undo all this work to figure out which HDMI cable goes to which monitor.
Step 9: Take an “after” photo. Compare it to your “before” shot. The difference is usually dramatic—and deeply satisfying.
How to Choose the Right Cable Management Solutions for Your Home Office
With 7 products in front of you Pair your choices with an ergonomic home office setup for a workspace that supports both focus and physical comfort., the question isn’t “which one?” — it’s “which combination?” Every desk is different, and the best cable management solutions for home office setups almost always involve layering 2–4 products together. Here’s how to think about your choices before you buy.
Under-Desk vs. On-Desk vs. Wall Management — Where Are Your Cables?
Start by looking at where your cord chaos actually lives. This one question will eliminate half the options:
- Under-Desk Management: If the mess is concentrated beneath your desk — power strips on the floor, dangling laptop chargers, a spaghetti pile of cables — you need an under-desk cable tray or a cable management box. Pair either with velcro ties to bundle cables before they go into the tray. An under-desk mounted power strip is the finishing move — it keeps power access at desk level so no cords ever touch the floor.
- On-Desk Management: If your desk surface is the problem — charging cables for your phone, tablet, watch, and headphones all sprawled across your workspace — adhesive cable clips and a USB-C docking station are your answer. Clip the cables to the back edge of your desk so they’re always within reach but never in the way. A docking station eliminates the need for most of those individual chargers entirely. For cables that must cross the desk surface, a desk grommet routes them cleanly through a hole instead of draping them over the edge.
- Wall Management: If cables run from your desk to a wall outlet or along baseboards, you need cable raceways. These paintable PVC channels hide cords along walls and can make a rental-friendly installation disappear visually. Pair them with cable sleeves for any sections where multiple cables run the same path before entering the raceway.
Permanent vs. Temporary — How Often Do You Rearrange?
This is the question most buyers skip — and it’s the one that determines whether you love or regret your purchase. Be honest about your setup habits:
- You rearrange your desk every few months (swapping monitors, testing new layouts, seasonal changes): Stick to velcro ties, cable sleeves, and adhesive cable clips. These are infinitely adjustable and leave zero damage when removed. Skip the screw-mounted under-desk tray — you’ll hate reinstalling it every time you move things around.
- You set it and forget it (your desk hasn’t moved in two years and you like it that way): Go all-in. Under-desk cable tray with screw mounts, raceways secured to the wall, a mounted power strip, and cable labels so you never guess which cord is which. The upfront effort pays off every single day you sit down to a completely invisible cable setup.
- You rent and can’t drill holes: Use clamp-mount trays (no screws), peel-and-stick raceways, adhesive clips, and cable boxes. Every product on this list has a no-drill version available. Just be aware that adhesive-based solutions need smooth, clean surfaces — textured or painted drywall will eventually let go.
Budget Ranges — What You Get at Each Price Point
You don’t need to spend a lot to fix cable chaos, but spending a little more gets you results that last. Here’s what each tier delivers:
- Under $20 — The Essentials Kit: Velcro ties ($7) + adhesive cable clips ($9) = a clean-looking desk for under $20. This handles 70% of home office cable problems. Your cables will be bundled and routed along desk edges — not invisible, but organized. Add a cable sleeve ($12) and you’re at $28 for a dramatically cleaner setup.
- $30–$75 — The Mid-Range Transformation: Add an under-desk cable tray ($35) and a cable management box ($25). Now cords are off the floor and power strips are hidden. This is the sweet spot where your desk starts looking like the ones in setup photos. Most home offices never need to go beyond this tier.
- $100–$200 — The Pro Setup: Add an under-desk mounted power strip ($35) and cable raceways ($20). Every cable is now managed from wall to device. Your desk looks professionally installed. Add a desk grommet ($15) if cables pass through the desk surface.
- $200+ — The “One Cable” Dream: A USB-C docking station ($150–$300) paired with everything above. You dock your laptop with a single cable that handles power, dual monitors, ethernet, and all your peripherals. This is how you go from “managed cables” to “what cables?” If you use a laptop as your primary machine, this is the single highest-impact purchase on the entire list.
Pro tip: Start at the tier you can afford today and add pieces over time. Cable management isn’t all-or-nothing — every product you add makes a visible difference. I started with a $7 pack of velcro ties on a Saturday morning, and the improvement was enough to keep me motivated to tackle the rest over the next few weekends.
Frequently Asked Questions About Cable Management Solutions for Home Office
How much should I spend on cable management?
For more desk organization inspiration, browse our clutter free desk ideas to complement your cable management setup.
You can solve basic cord chaos for under $20 with velcro ties and adhesive clips, or go all-in with a full under-desk system for $100–$200. Most home offices land somewhere in the middle — around $50–$75 gets you a cable tray, a box for your power strip, and ties for bundling. Think of it as a one-time investment: unlike tech gear, cable management products don’t go obsolete. Spend once, enjoy a clean desk for years.
What tools do I need to install cable management?
Most cable management solutions for home office setups require minimal tools. Here’s the quick breakdown:
- No tools at all: Velcro ties, adhesive cable clips, cable sleeves, cable labels, and cable management boxes all work right out of the package.
- Basic tools (screwdriver only): Under-desk cable trays that use clamp mounts or screw-in brackets. A Phillips-head screwdriver is usually all you need — and many trays include the screws.
- Moderate tools (drill + level): Wall-mounted cable raceways and certain under-desk trays that require drilling into the desk. If you’re renting or don’t want to drill, look for clamp-mount or adhesive alternatives — they exist for nearly every product category.
- Optional but helpful: A cable tester or label maker if you’re managing a complex setup with Ethernet runs, and a pair of flush cutters if any zip ties need trimming (though velcro ties eliminate that need entirely).
How do I manage cables when I share a desk with my partner or kids?
Shared desks multiply cable chaos — two laptops, two phones, maybe a tablet, and suddenly you’re drowning in chargers. The fix is a layered approach:
- Centralize power with a mounted under-desk power strip that has USB ports built in. One strip serves both users without cords criss-crossing the floor.
- Color-code with cable labels or different-colored velcro ties — assign one color per person. When a cable comes unplugged, you instantly know whose it is.
- Use a USB-C docking station for each laptop. Each person docks with one cable; no one has to unplug and replug a tangle of peripherals when it’s their turn at the desk.
- Route shared cables high, not low. Use adhesive clips along the back edge of the desk so cables are accessible to both users but out of the workspace. Nothing draped over the front edge where someone’s arm will snag it.
- Assign a “cable zone” per person. The left side of the desk belongs to one person’s cables, the right to the other. A cable sleeve on each side keeps bundles separate and identifiable at a glance.
Do I really need a docking station for cable management, or is that overkill?
If you use a laptop as your primary computer, a docking station isn’t overkill — it’s the single product that prevents cables from accumulating in the first place. Think of it this way: without a dock, you plug in your power cable, your monitor cable, your keyboard, your mouse, your webcam, your ethernet, and maybe external speakers — that’s six or seven cables every time you sit down. With a dock, it’s one cable. For desktop users with a tower PC, a docking station is unnecessary — focus on under-desk trays, ties, and sleeves instead.
What’s the best cable management solution for a standing desk?
Standing desks add one critical variable: everything under your desk has to move up and down with it. Your cable management needs to handle that motion without snagging or pulling. Here’s what works:
- Under-desk cable tray (clamp-mount): Mounts to the desk frame and moves with it. Use velcro ties inside the tray to keep everything from shifting during height changes.
- Under-desk power strip (mounted): Attach to the desk frame or underside — one power cord goes from the strip to the wall outlet. That’s the only cord that needs slack for the full range of motion.
- Cable spine or flexible conduit: For the one cord running from desk to wall, use a flexible cable spine (also called a cable chain) that extends and retracts as the desk moves. Cable sleeves also work, but leave enough slack for the highest standing position.
- Avoid: Cable raceways on the wall (they don’t move with the desk), adhesive clips under the desk (the constant flexing can break the adhesive over time), and any setup where cables are zip-tied to a stationary object like a wall or floor.
Next Steps: Complete Your Home Office Setup
Once your cables are under control, tackle the rest of your workspace. A clean desk pairs best with an ergonomic chair that actually supports your back and a desk lamp that reduces eye strain through long workdays. If you’re ready for a full refresh, our complete home office under $500 guide covers everything from desk to decor.
Clean Desk, Clear Mind
Cable management isn’t glamorous, but it’s one of those rare home office upgrades where a small investment of time and money pays back every single day. Every time you sit down to a clean, organized desk—no tangled wires, no mystery cables, no foot-snagging hazards—you’re removing one more friction point between you and focused work.
Start small if you need to. A pack of velcro ties and ten minutes of bundling will already make a noticeable difference. Then add a cable tray, a management box, or a docking station as your budget allows. Your future self, sitting at a clean desk with everything exactly where it should be, will thank you.
And once your cables are under control, take the next step: check out our home office desk setup ideas for more ways to build a workspace that helps you do your best work.
Sophia Carter has spent years testing productivity tools and workspace setups. She helps remote workers build efficient home offices that support deep focus, ergonomics, and better workflows.