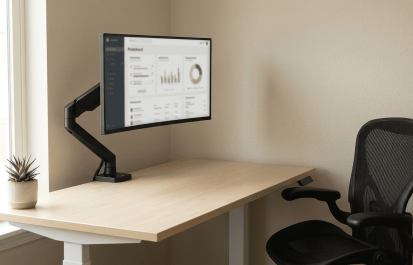
If you have ever tried to fit a desk lamp, a notebook, a second screen, and your lunch onto the same 48-inch desk, you already know the problem. The factory monitor stand that came in the box eats up seven inches of depth and gives you nothing in return. A monitor arm solves this in minutes — and it does a lot more than free up desk space.
| Feature | What to Look For |
|---|---|
| Weight capacity | Monitor’s weight without stand + 20–30% margin |
| VESA pattern | 75×75 or 100×100 (check monitor back) |
| Mount type | Clamp (most desks) or Grommet (pre-drilled hole) |
| Arm configuration | Single (flexible) or Dual (symmetrical setups) |
| Adjustment | Gas spring (smooth) vs mechanical spring (budget) |
If you are choosing a monitor arm for the first time, this guide walks you through every decision — weight, VESA, single vs dual, clamp vs grommet — and the mistakes people make when they rush it.
Why a Monitor Arm Beats the Factory Stand
A factory monitor stand is designed for one thing: keeping the monitor upright in a retail display. It is not designed for your desk.
The desk space argument alone is worth it. A typical stand base takes up 30–40 square inches of usable desk surface. That space comes back the moment you clamp an arm to the edge. If your desk is under 55 inches wide, a monitor arm is not a luxury — it is how you get your desk back.
Ergonomics improve immediately. Most factory stands sit too low, forcing you to tilt your head down — a posture that loads your cervical spine and leads to neck pain by the end of the day. A monitor arm lets you position the screen so the top of the display is at eye level. It also enables neutral wrist positioning when paired with a keyboard tray or standing desk.
You can actually use the space under your monitor. With the factory stand gone, the area under the screen becomes usable — slide a notebook, a tablet, or a small lamp underneath without obstruction.
Weight Capacity: The Number That Matters Most
The single biggest mistake people make with monitor arms is picking one that cannot hold their monitor.
Every arm has a weight range — for example, 4.4–19.8 pounds. That range is not optional. If your monitor is under the minimum, the arm will not stay down — it will drift up like a balloon because the gas spring has nothing to counterbalance. If your monitor is over the maximum, the arm will sag and slowly sink over the course of a day.
Most 24–27 inch monitors weigh between 8 and 14 pounds without the stand. For a safe margin, take your monitor’s actual weight and add 25–35 percent. If your 27-inch screen weighs 12 pounds, pick an arm rated for at least 16 pounds. The number to trust is weight without the stand — that is what the arm actually carries.
Also check both the minimum and maximum. Arms with a minimum above 6.6 pounds will not work with lighter portable monitors. Arms with a maximum below your monitor’s weight will fail within weeks.
VESA Compatibility: Does Your Monitor Have the Holes?
VESA is the mounting interface standard. Almost every monitor arm uses it, and almost every monitor made after 2015 supports it — but you should check before buying.
Flip your monitor around and look at the back. If you see four threaded screw holes arranged in a square, that is a VESA pattern. The two sizes that matter are 75×75mm and 100×100mm. Most arms support both.
If there are no holes — which happens on some curved ultrawides, budget monitors, and older iMacs — you need a VESA adapter bracket made for your specific model. These cost $20–45 and are worth it if you like the monitor you already own. But if you are buying a new monitor anyway, pick one with native VESA support and skip the adapter.
Single vs Dual Monitor Arms
This decision depends on how many screens you use and how much flexibility you want.
A single arm is the safer choice for most people. It gives you independent placement, full adjustment range, and the freedom to reposition one screen without touching the other. If you have two different-sized monitors or switch between landscape and portrait orientation, two single arms are the way to go.
A dual arm mounts both monitors on a single pole or crossbar. This looks cleaner and saves one clamp position. But you lose flexibility: both monitors move as a pair, and if they are different weights, the heavier one can pull the crossbar off-center. Dual arms work best when both monitors are the same model and you want a symmetrical desk aesthetic.
If you are undecided, buy two single arms. It costs slightly more but you will never regret the flexibility.
Clamp vs Grommet Mount
Most monitor arms include both mounting options in the box. The question is which one fits your desk.
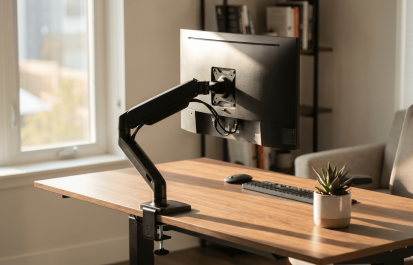
A clamp mount grabs the edge of your desk and tightens with a screw mechanism. It works on desks 0.4–2.4 inches thick and requires zero modifications. The clamp leaves a small impression mark on soft wood surfaces — use a protective plate if your desk is solid wood or finished.
A grommet mount drops through a pre-drilled hole in your desk and secures from underneath with a bolt plate. This is more stable because the load is distributed across the desk surface instead of concentrated at the edge. But it only works if your desk already has a cable management hole or you are willing to drill one.
Most people should use the clamp. It is faster to install, easier to move, and works on nearly every desk. Use the grommet mount only if you have a pre-existing hole or a very heavy monitor on a thinner desk where edge clamping is risky.
Setup Tips That Prevent a Bad First Day
A monitor arm is simple hardware, but a few minutes spent on setup prevents hours of frustration later.
Tighten the clamp with the desk empty. Clamp stability depends on even pressure distribution. Position the clamp, hand-tighten the screw until firm, then give it an additional quarter turn — no more. Overtightening can crack composite desks.
Set the tension before you attach the monitor. Most gas spring arms ship with the tension set to maximum. If you attach the monitor first and then loosen the tension, the arm will spring upward when you release the adjustment screw and can hit you or the screen. Adjust tension in small increments, attach the monitor, and test.
Route cables before you finalize the position. Thread power and video cables through the arm’s cable management channel before you position the arm in its final location. Otherwise you will be fishing cables through awkward angles with one hand while holding a monitor with the other.
Test the full range of motion. Move the monitor through every position you might use — seated, standing, tilted for sharing, pushed back for focused work. If there is a dead zone where the arm binds or sags, adjust the tension before you commit to cable routing.
Common Mistakes That Ruin a Monitor Arm
Mistake 1: Skipping the weight check. This is the most expensive error because you cannot fix it. If your monitor is too light, the arm drifts up and the gas spring cannot be tuned low enough. If it is too heavy, the arm sags and eventually fails. Weigh your monitor without the stand before you buy anything.
Mistake 2: Buying an arm rated for a monitor you might upgrade to. Arms work best when the monitor weight is in the middle of the rated range — not at the edge. If your current monitor weighs 8 pounds and you buy an arm rated for 22 pounds “in case I upgrade,” the arm may not counterbalance correctly for your current screen. Buy for the monitor on your desk today.
Mistake 3: Ignoring desk material. Glass desks cannot take clamp mounts — the localized pressure can crack the surface. Particle board desks with a thin laminate finish can compress under a heavy arm over time. Solid wood and thick bamboo handle it best. If your desk material is questionable, spread the load with a reinforcement plate between the clamp and the desk surface.
Mistake 4: Mounting at the wrong desk location. The monitor arm should be positioned so the screen is directly in front of you when you are sitting in your normal working posture — not off to the side where you will twist your neck to see it. The clamp goes behind the monitor’s ideal position, not next to it.
Mistake 5: Not checking the return policy. Monitor arms are one of the few home office categories where fit is genuinely unpredictable until you try it — desk thickness, monitor weight, and cable routing can all present surprises. Buy from a retailer with a solid 30-day return policy and keep the packaging until you are sure the arm works for your setup.
Quick-Decision Checklist
- ✅ Weighed your monitor without the stand
- ✅ Confirmed VESA holes on the back (75×75 or 100×100)
- ✅ Measured desk edge thickness (0.4–2.4 inches for most clamps)
- ✅ Decided: single arm or dual
- ✅ Decided: clamp or grommet
- ✅ Checked arm weight range covers your monitor at both min and max
When You’re Ready to Buy
Once you know your monitor’s weight, VESA pattern, and desk setup, the buying decision gets simpler. We tested arms across every price point and work scenario — fixed desk, standing desk, dual monitors, ultrawide monitors — and published our picks in the best monitor arms for home office 2026 guide.
If you are upgrading your entire desk setup, a monitor arm pairs especially well with cable management solutions — once the arm gets the desk surface cleared, routing cables properly makes the whole workspace feel professional. For the bigger picture on ergonomics, see our ergonomic home office setup guide and the complete home office setup guide, which covers desk height, monitor positioning, and lighting.
A monitor arm is one of the highest-impact upgrades you can make to a home office. It costs less than a monitor, takes 15 minutes to install, and improves your posture, your desk space, and how you feel at the end of a long workday. Do the five-minute prep work — weigh the monitor, check the VESA pattern, measure the desk — and the actual install is straightforward.
Frequently Asked Questions
What weight capacity do I need for a monitor arm?
Take your monitor’s weight without the stand and add 20–30%. A 12-pound monitor needs an arm rated for at least 16 pounds. Most 27-inch monitors weigh 8–12 pounds without the stand.
Does my monitor need VESA holes for a monitor arm?
Yes. Look for four threaded holes in a square pattern on the back of your monitor — either 75×75mm or 100×100mm apart. If there are no holes, you need a VESA adapter bracket for your specific monitor model.
Clamp or grommet mount — which is better?
Clamp mounts work on most desks with no modifications. Grommet mounts are more secure and better for heavier monitors, but require a hole in your desk. If your desk has a pre-drilled cable management hole, use grommet.
Can I put a monitor arm on a glass desk?
No. Most manufacturers explicitly warn against mounting on glass — the concentrated pressure can crack the surface. Use a freestanding height-adjustable stand instead.
Single arm or dual monitor arm?
If your monitors are the same size and you want a clean look, dual arm works well. If they’re different sizes or you want to position them independently, buy two single arms — more flexible and easier to reconfigure later.
Sophia Carter has spent years testing productivity tools and workspace setups. She helps remote workers build efficient home offices that support deep focus, ergonomics, and better workflows.